


I’m so glad you’re here! Binding with TransTape is a wonderful freedom, but there are some important things you need to know as you ride the learning curve of mastering your specific application technique! I’ve got your back and I’m here to help it go as smoothly as possible.
First, you’ll need to identify what product you need! If you already have your TransTape, skip to the next section. :) If you’re the around the same chest size as me (B cup) you may do well with the large that I order. It’s perfect for good coverage.
What size TransTape do I need?
TransTape offers multiple sizes for many different chest densities and shapes. To Identify which size you need this is a good guide to start from:
A/B cups will want to use the small, 3-inch wide roll as you will not need as much skin coverage.
B/C cups typically benefit from the medium, 4-inch size as it tends to cover the tissue well with one strip.
D/DD+ and larger tend to enjoy the large, 5-inch wide size as it helps to cover a large amount of skin and tissue with a single piece.
I’ve also heard larger-chested customers report back that they prefer to use the small-size strips in combination with the large size because it’s easier to manage. There are many ways to use TransTape as there are many types of bodies!

LET’S GET STARTED APPLYING OUR TRANSTAPE!
FIRST: Use a Test Strip On Your Chest or forearm.
Before applying for the first time, I recommend using putting the small 2” x 2” square on your side under your arm. Monitor the area for 24 hours. Slight itching is normal as your skin gets used to having a foreign substance adhering to it. Pain and burning are not normal and you should discontinue use. Use oil to remove even a small strip.
Clean & Dry Your Chest
The LAST thing you want is your TransTape falling off. The best time to apply your tape is fresh out of the shower on clean dry skin. Don’t apply deodorant or lotions to the area before applying to be sure you get a strong bond.
PRO-TIP: Wipe the chest with alcohol before putting on any strips and let it completely dry to maximize adhesive.
Cut To Length Your Strips
You’ll be able to choose the length you’d like by using the backing paper measurement lines of the roll. Start by cutting three of the large sections and adjust from there. You may need an extra section or two depending on your size! Once you have two of these strips, use sharp scissors and round the edges of your tape to allow for an even distribution of tension. If you skip this part, the edges of the tape can cause skin irritation and we ain’t trying to do all that!
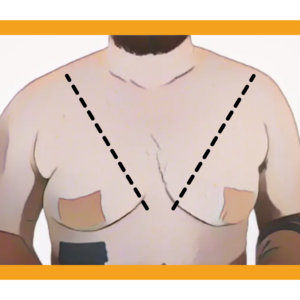
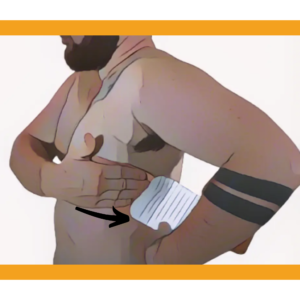
Apply Anchor In The Center Of Your Chest
OMG! You’re ready to apply it to your chest now! :D Visualize this V on your own chest to know where not to apply TransTape to keep a discreet, open chest look without knowing you’re even binding at all. :D
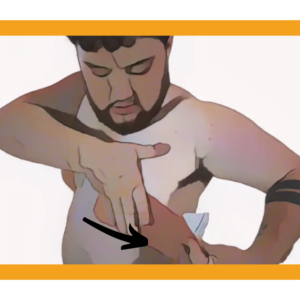
Carefully peel back the first 2 inches of the backing and fold the backing paper across the line. Apply the top corner of the strip to evenly cover your nipple cover. With only 1-2 inches attached to your skin, rub the tape with your hand to activate the adhesive.
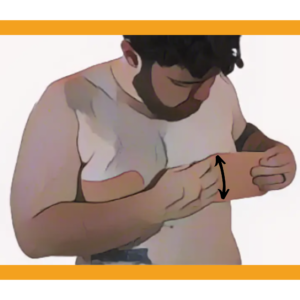
Avoid touching the sticky adhesive with your hands and peel the backing off the tape even further and fold along the last 1-2” of the strip. Avoid applying wrinkles, and lean to the side with your tissue falling naturally under your arm. With the opposite hand, move your tissue to the side, and stretch the tape to 50% of its capacity to secure the tissue in place.
Some people think they need to stretch the tape MAX CAPACITY and that is not the case. Overstretching will lead to itchiness and discomfort and that’s the opposite of what we’re trying to do here!
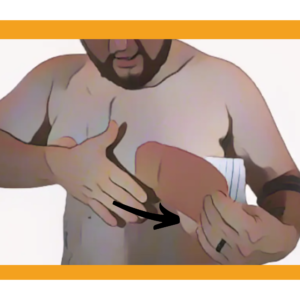
Now, with zero tension, use one hand to peel the last of the backing off with the other, and smooth the rest of the tape down with no wrinkles. That’s it, my friend! You’ve applied your first strip - whoo hoo! :D
If you’re happy with that result that you are good to go to start on the other side of your body! If you’re still seeing some bulging of tissue or not enough security, try applying another strip and repeating the same steps. Also, consider next time ordering the next size up to test for your body, and some people use a combination of sizes so consider that as well in your order.

That’s Not Working… :(
Don’t worry! If you’re close to the result you’re looking for, it may just take a few times for you to get comfortable moving your tissue and giving yourself a chance to ride the learning curve. If you’re not even close, you may need a different application style to match your body better. If you have a larger chest than I do, then you may need to reference my buddy Beau’s application technique as he is a DD+ size.
It’s also very important that you try this, especially the first time, in good head space. If you suffer from gender dysphoria, maybe try this for the first time on a day that tough mentally. You need to be able to handle your body and be patient with yourself.
Also, remember that TransTape has a live chat feature where someone is there to help you apply every single business day! These are real people on the chat and they are experts that can help strip by strip get you to success.
But Is Binding With Tape Safe?
Taping is very safe if done properly and with the correct type of tape. With all binding methods, there are precautions to take to ensure the best result and to lessen the chance of damage. Always use TransTape that was intended for the body, and NEVER use duct tape or Ace bandages to bind your chest.
Taping can be better than a traditional binder as it does not restrict, constrict, or compress your body or organs at all. Taping allows for the full range of motion, mobility, and breathing. It is more discreet than binding as it does not cover the back, chest, or shoulders and is not visible under your garments.
How To Remove Tape For FTM Binding
Fraying on the edges? Discoloration? That’s a good sign you’re ready for a fresh application. Ready to take off your test strip? Whether you’ve had it on for three to five days or you’re ready to take off your test strip, be sure to soak the tape ENTIRELY. Use either the TransTape Removal Oil (or your cooking oil) and drench the tape. I usually prefer to do this in the hot, steamy shower for 1-3 minutes. Usually, I apply it as soon as I get in and by the time I’m done washing my hair and my face, it can easily be peeled back in the same direction I applied it.
It’s imperative to use oil to remove the tape because when people hurt their skin by overstretching the tape or they are tearing it off their skin without oil. This adhesive is meant to hold through hell and back so if you pull it off without releasing that bond, your skin will go with it. This is the most important part to remember because we need to respect our bodies and our skin.
As a daily user of TransTape for chest binding safely, I genuinely care about sharing this solution because if used correctly, I believe it’s a safer and more freeing option than traditional chest binders. TransTape changed my life and I’m thankful to be able to help others on their own journey to authenticity.
As always, sending you love and light,
Aaron Capener

Check out my journey here!

